Executive Summary
SHA 256 Hash: a294620543334a721a2ae8eaaf9680a0786f4b9a216d75b55cfd28f39e9430ea
ESET researchers published a report on a new wiper malware first discovered in a limited number of organizations in Ukraine. It was first detected on 14 March 2022 at 9:38 AM UTC. This is the 3rd wiper malware discovered since 23 February 2022.
The sample, a 32-bit Windows Portable Executable (PE) binary, was obtained from MalwareBazaar. It is a destructive wiper program that runs on Windows platforms. Upon execution, the malware first identifies if it is running on a Primary Domain Controller, if so the malware exits harmlessly. If the machine is NOT a Primary Domain Controller, the malware continues executing.
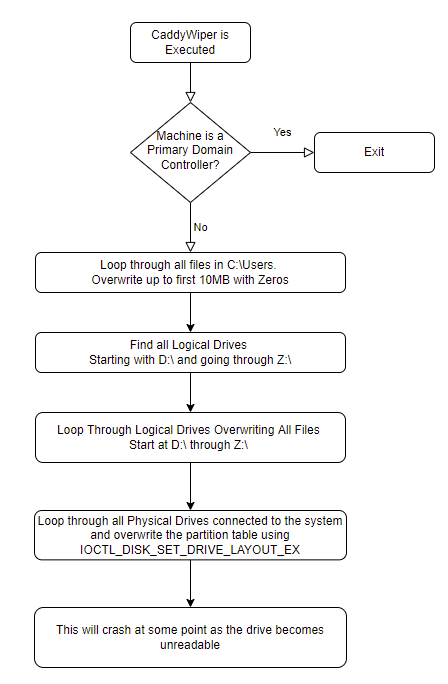
CaddyWiper has a three stage wiper process:
- All files in the
C:\Usersfolder are overwritten with zeros.- Up to the first 10 MB is the file is larger than this
- The Access Control List is also destroyed.
- All files in logical drives
D:\throughZ:\are then similarly overwritten- This includes network mapped drives
- Finally, the partition tables on the first 10 drives attached to the computer are overwritten with zeros.
This malware is destructive. It overwrites data with zeros and destroys hard drive partition tables. The only way to recover is to rebuild the machine and load data from backups.
As Primary Domain Controllers are spared by this malware, it can be assumed that the Domain Controller is a mechanism for distributing the malware. The attackers most likely have gained access to the Domain Controller before delivering this payload.
A YARA signature rule is included below after the analysis.
Indicators of Compromise
The malicious binary will be present. The original name seems to be caddy1.exe, but the file could be named anything. Compare unknown files to the hashes below, or using the provided yara rule to identify samples of this malware.
MD5: 42e52b8daf63e6e26c3aa91e7e971492
SHA256: a294620543334a721a2ae8eaaf9680a0786f4b9a216d75b55cfd28f39e9430ea
While the malware is running and actively overwriting files, you may experience a popup saying that the file, shortcut, executable, etc cannot be opened.

Additionally, Access Control List permissions are overwritten, so you may see access denied errors. If you check with icacls there are no permissions on the sample affected folder in the following screenshot.

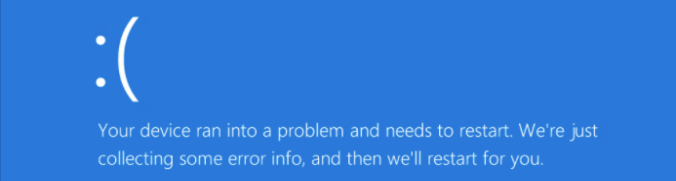
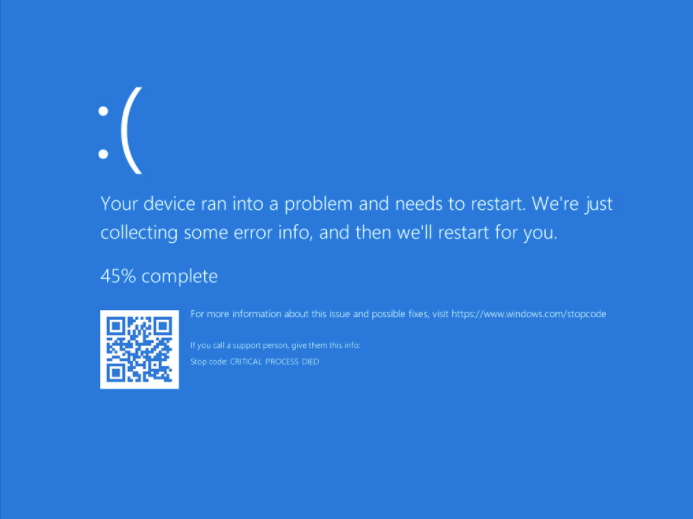
As Windows becomes unable to read the drive containing the operating system, it will notify you of a problem and crash.
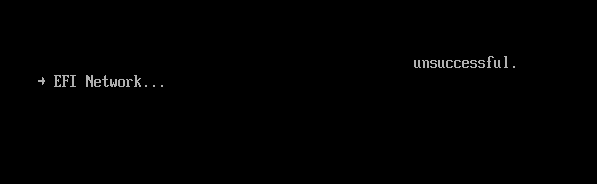
The final item of note is that there is not any persistence mechanism as the malware renders the machine inoperable. When attempting to boot an affected machine, you may see an error message. In this case, it simply says unsuccessful and attempts to boot from other options.
High-Level Technical Summary
CaddyWiper first checks to see the role assigned to the machine it is currently running on using the DsRoleGetPrimaryDomainInformation function. If the machine is a Primary Domain controller, the execute stops here.
If the machine has any other role, CaddyWiper begins overwriting all files in the C:\Users folder recursively. For small files, the entire file is overwritten with zeros. For larger files, only the first 10 MB are overwritten. Once this is complete, it iterates through all drives from D:\ to Z:\ and overwrites all files in those drives (including network shares).
After the discovered files have been overwritten, the malware attempts to overwrite the partition tables of all drives connected to the machine. Again, this is done with all zeros. Eventually the machine will crash to a blue error screen and is further unable to boot.
Malware Composition
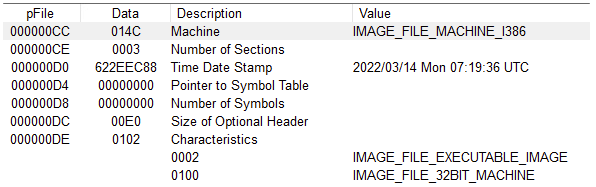
The CaddyWiper malware consists of a single 32-bit PE binary.
It was compiled on 14 March 2022 at 7:19:36 UTC. This was approximately 2 hours before ESET first identified it. This can be manipulated, so this timestamp should be viewing some some caution.
Technical Analysis
Basic Static Analysis
A basic static analysis was performed on the malware binary. The file was first fingerprinted using MD5 and SHA256 algorithms.
MD5: 42e52b8daf63e6e26c3aa91e7e971492
SHA256: a294620543334a721a2ae8eaaf9680a0786f4b9a216d75b55cfd28f39e9430ea
VirusTotal was queried using the SHA256 hash. At the time of publishing this report, 48 of the 68 virus scanning engines have flagged this sample as being malicious.

VirusTotal had first seen this sample on 14 March 2022 at 12:40:26 UTC. It had been uploaded with several different file names, but caddy1.exe was among them. This is where ESET named the sample CaddyWiper.
To Pack or Not to Pack
Malware is often compressed to assist in evading antivirus detection. Packed samples can often be identified when comparing the PE files Virtual Size to the Size of the Raw Data.
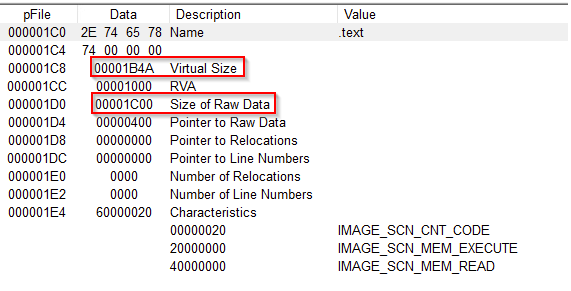
The Virtual size of 0x1B4A (6,986) is similar to the Raw Data size of 0x1C00 (7,196) meaning it is unlikely that this sample has been compressed or packed in some way.
Import Address Table
The Import Address Table details the functions the malware imports to accomplish whatever functions it was designed to do. These can often provide clues to what the malware is doing. However, in this case there is only 1 function imported. This is very unique. Typical programs, both benign and malicious, have significantly more imports than this.
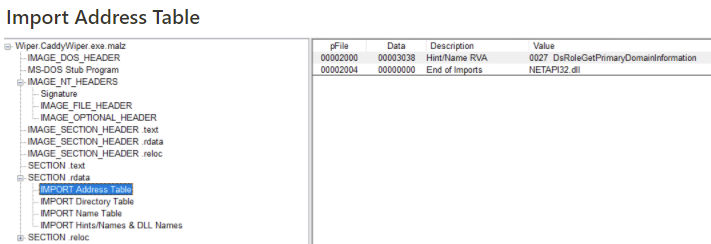
This sample is importing DsRoleGetPrimaryDomainInformation. This function returns the state of the directory service installation and information about the domain, if the machine has been added to one.
Later in the analysis, I observed that malware has implemented a method to import the required function at runtime. Otherwise, we are not able to glean much information here.
Strings
It is often possible to extract characters from the raw binary that can be decoded into ASCII or Unicode text that may indicate functions, URLs, etc. This binary had a very limited amount of strings exposed…however some were of note.
DsRoleGetPrimaryDomainInformation
C:\Users
\\.\PHYSICALDRIVE9
DeviceIoControl
WriteFile
LoadLibraryA
FindFirstFileA
These strings indicate some key functionality of the malware:
C:\Usersand\\.\PHYSICALDRIVE9are paths that are used in the wiper functionsWriteFileandDeviceIoControlare the functions used to destroy files and the partition tables of the attached hard drivesLoadLibraryAis used to import additional functions at runtime, making them a little more difficult to identify.
Basic Dynamic Analysis
Network Indicators of Compromise
No unique network traffic was observed from this sample. Accessing remotely mounted file shares was observed, but this was identical to legitimate usage. The malware was not observed to reach out to any remote IPs or Domains.
Host Based Indicators of Compromise
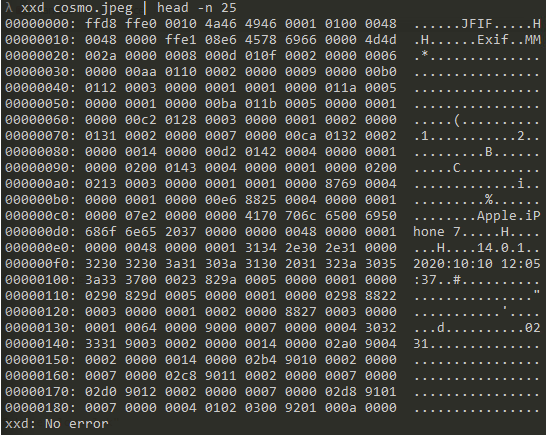
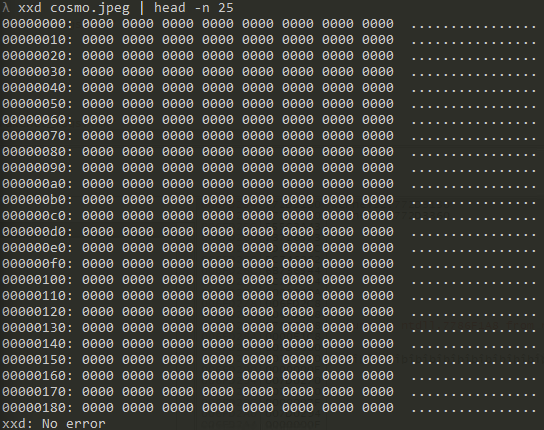
During the execution of the malware, it was possible to observe files that have been corrupted before the system crashed. A JPEG picture was on the Desktop of the user that executed the malware. You can see the normal JPEG header in the file before it was corrupted. The file starts with the correct FF D8 byte sequence.
After the malware has run, the file has been overwritten entirely with zeros. The FF D8 sequence, as well as all the other data, has been replaced with 00 00.
Advanced Static Analysis – Reverse Engineering
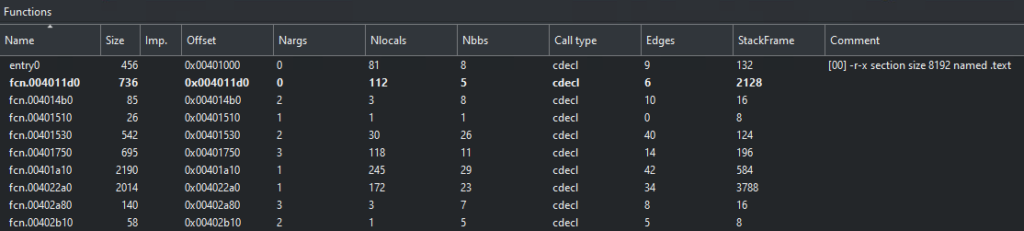
The majority of the analysis was performed via advanced static analysis. The malware only has 10 functions, so it is not overly complex. Of these, only 3 are key to the malware’s function.
Importing Functions
As noted in the basic analysis, there was only 1 function imported in the Import Address Table. However, when looking at the code, there is an obfuscated method for importing functions at runtime.
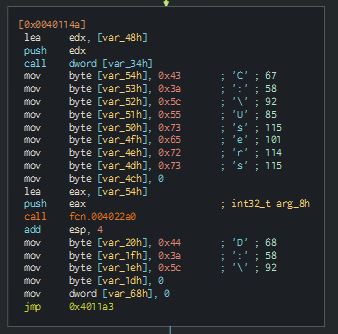
The function name and the name of the dll that contains that function are encoded in hex bytes. Each letter is assigned to a single variable, sequentially.
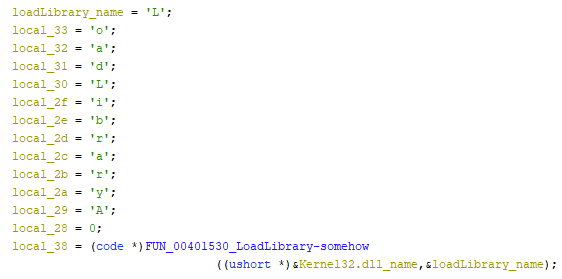
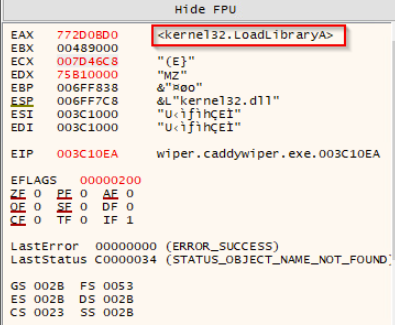
The address of the first letter of the dll name and the address of the first letter of the function name are passed to this FUN_00401530 function. This function then combines the letters and uses LoadLibraryA to import the specified function and return a handle to that function as seen in the EAX register in the image below.
This is how the malware has such a limited Import Address Table.
The Entry Function – Main
The main function of the malware is large, but straightforward.
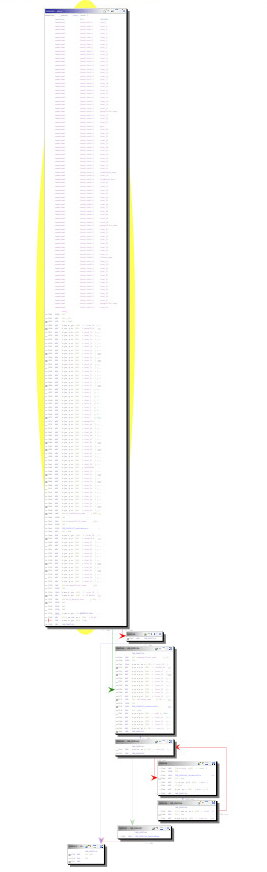
The long block at the top is where some dll names and function names are encoded as detailed above. The interesting function happen at the bottom of this first block and the subsequent blocks. There are 2 wiper functions, 1 for files and 1 for hard drive partition tables. They happen sequentially as seen in the decompiled code below.
Step 1: Determining the Machine Role
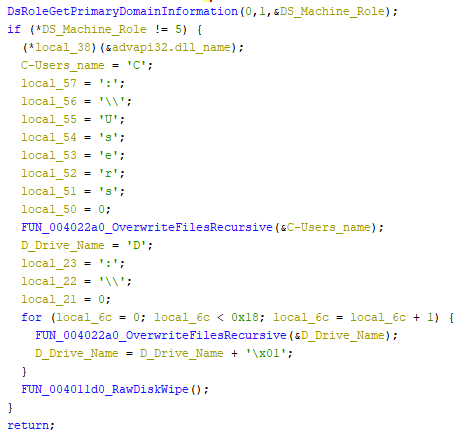
The malware does not wipe and destroy Primary Domain Controllers. So the first thing the malware needs to do is identify if it is running on a Primary Domain Controller.

At the top of the image, we see the call to DsRoleGetPrimaryDomainInformation. If the result of this function is a value of 5, then we just down and exit the program – the lower right hand block highlighted in red. This value of 5 corresponds to the constant for DsRole_RolePrimaryDomainController. Again, if the machine is a Primary Domain controller, exit the program.

However, if we are running on any other machine, follow the green arrow to the malicious core of the program.
Step 2: Wiping Files in C:\Users
After the malware checks to see that it is not running on a Primary Domain Controller, the malware then enters this block of code. This is the section that wipes files from C:\Users.
Once the C:\Users path is passed to the wiper function, the malware will do some obfuscated importing of functions, as detailed above. Eventually it will get to the main core of the file wiper function.
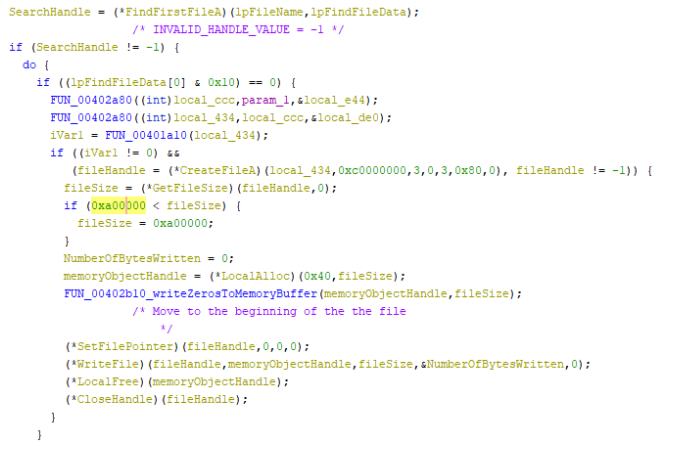
Using the FindFirstFileA , the malware will get a handle to the first discovered file. This file will be opened and the file size checked. If the file is larger than 0xA00000 or 10,485,760 bytes, the fileSize variable is set to 10 MB. This is most likely for speed purposes since destroying the first 10 MB of any file should sufficiently corrupt it.
After getting the file size, a memory segment is allocated and filled with zeros.
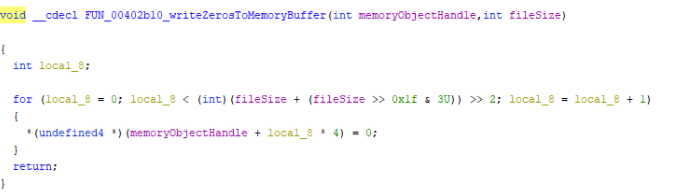
This zeroed memory segment is then written to the file starting at the beginning of the file. The file is closed and the process repeats for the next file.
The malware grants itself the SeTakeOwnershipPrivilege. Using this privilege, the Discretional Access Control List (DACL) for each folder and file is also over written with zeros so no one has access to it using the SetNamedSecurityInfoA API call.

Step 3: Encrypting Other Logical Drives
After the malware zeros out all the files in the C:\Users folder, it moves on to any other logical drives that may be connected. These may be local and/or remote network shares that have been mapped to a drive letter.
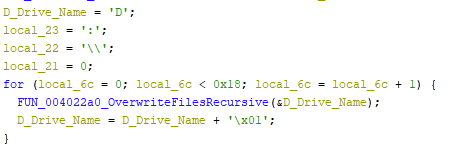
The malware starts the process on the D:\ drive. If found, it will loop through all the files using the same function detailed above to write Zeros to the full file, or first 10MB.
After checking for the D drive, it will continue to check each additional letter (D, E, F, etc) incrementing by 1 each time until it reaches the Z:\. Interestingly, the malware also checks for the presence of [:\ which is the character after Z. I believe this is just a mistake in the coding.
Step 4: Destroy the Partition Tables of Any Physical Disks
As a last destructive step, the malware destroys the partition tables of any physical drives connected to it. This renders the machine unusable as the system will not be able to boot from the now corrupt hard drive.
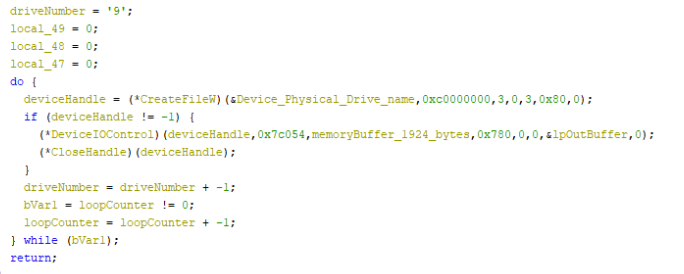
This code is interesting. Where the logical drive wiping code started at D: and incremented up, this starts at \\.\PHYSICALDRIVE9 and counts down. This is most likely to ensure that additional drives will be wiped before the system drive (most likely \\.\PHYSICALDRIVE0) is corrupted and the system crashes.
The malware uses the function DeviceIOControl and the IOCTL_DISK_SET_DRIVE_LAYOUT_EX Control Code to overwrite the existing partition table with zeros. This destroys the partition table and the system is no long able to use that device.
At the completion of this code, the system will crash and then will not be able to be rebooted.
Yara Rule for Detection
The following yara rule has been developed to identify samples of CaddyWiper in the wild.
rule CaddyWiper {

    meta:
        last_updated = "2022-03-16"
        author = "Mike Bosland"
        description = "A yara rule to detect CaddyWiper"

    strings:
        // Fill out identifying strings and other criteria
        $PE_magic_byte = "MZ"
        $string1 = "DsRoleGetPrimaryDomainInformation" ascii

        // DeviceIOCtl
        $deviceiocontrol_hex = {
            C6 45 ?? 44
            C6 45 ?? 65
            C6 45 ?? 76
            C6 45 ?? 69
            C6 45 ?? 63
            C6 45 ?? 65
            C6 45 ?? 49
            C6 45 ?? 6f
            C6 45 ?? 43
            C6 45 ?? 6f
            C6 45 ?? 6e
            C6 45 ?? 74
            C6 45 ?? 72
            C6 45 ?? 6f
            C6 45 ?? 6c
        }

        // C:\Users
        $c_users_hex = {
            C6 45 ?? 43
            C6 45 ?? 3A
            C6 45 ?? 5C
            C6 45 ?? 55
            C6 45 ?? 73
            C6 45 ?? 65
            C6 45 ?? 72
            C6 45 ?? 73
        }

        // \\.\PHYSICALDRIVE
        $physical_drive_hex = {
            C6 45 ?? 5C C6 45 ?? 00
            C6 45 ?? 5C C6 45 ?? 00
            C6 45 ?? 2E C6 45 ?? 00
            C6 45 ?? 5C C6 45 ?? 00
            C6 45 ?? 50 C6 45 ?? 00
            C6 45 ?? 48 C6 45 ?? 00
            C6 45 ?? 59 C6 45 ?? 00
            C6 45 ?? 53 C6 45 ?? 00
            C6 45 ?? 49 C6 45 ?? 00
            C6 45 ?? 43 C6 45 ?? 00
            C6 45 ?? 41 C6 45 ?? 00
            C6 45 ?? 4C C6 45 ?? 00
            C6 45 ?? 44 C6 45 ?? 00
            C6 45 ?? 52 C6 45 ?? 00
            C6 45 ?? 49 C6 45 ?? 00
            C6 45 ?? 56 C6 45 ?? 00
            C6 45 ?? 45 C6 45 ?? 00
            C6 45 ?? 39
        }

    condition:
        // Fill out the conditions that must be met to identify the binary
        $PE_magic_byte at 0 and
        $string1 and
        ($deviceiocontrol_hex and $c_users_hex and $physical_drive_hex)
}
Recent Comments