I perform quarterly phishing awareness simulations for one of my consulting clients so I needed a way to easily recreate my phishing infrastructure. This is heavily inspired from this ired.team’s blog post. Just customized for my simple needs.
You can check out the code I’m using on GitHub.
Overview
For these assessments, I typically don’t worry about bypassing two-factor or anything fancy.
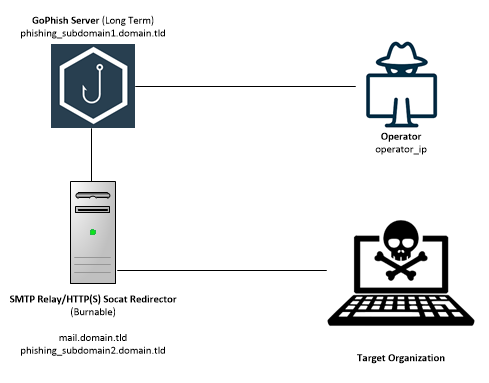
GoPhish Is the heart of this set up.
GoPhish sends (and tracks) the phishing emails and user actions. It also serves the landing page/captures credentials. This GoPhish server can be long term or backup the database and blow away the instance between engagements.
The virtual servers are hosted with DigitalOcean. You can use this link to get $100 when you sign up (note: this is a referral link). The servers are built and configured using terraform to make the process easily repeatable.
DNS Records
A few DNS records are set up automatically. The domains MX record is set to mail.domain_rdir. SPF and a DKIM placeholder are configured. The finalize.sh script will output the final DKIM string. This will need to be manually added in the DigitalOcean interface.
| Purpose | Variable Name |
|---|---|
| this is static, points to the phishing_rdr droplet | |
| phishing_subdomain1 | This is how I log into the GoPhish interface |
| phishing_subdomain2 | This is the URL for the landing page when building a GoPhish campaign |
Firewall Rules
We’re going to configure some firewall rules to secure the infrastructure.
- Only the
operator_ipcan log in over SSH using the configured SSH Keys. - The GoPhish server can only send SMTP traffic to the phishing_rdr server
- The servers can reach out to any DNS server
- Any IP can access the HTTP/HTTPS ports. Ideally you should narrow this down if you know the IP range of your target network.
- Only the
operator_ipcan access the GoPhish admin port (3333)
High Level Traffic Flow
- The Operator logs in to GoPhish over HTTPS on port 3333
- Once the campaign is ready, the GoPhish server will send out the emails to the SMTP relay on the phishing_rdr server
- The phishing_rdr server will strip sensitive headers from the email and send the emails to the targets
- Once the user opens and clicks on a link in the phishing email, the user will be sent to
phishing_subdomain2.domain_rdir. - The phishing_rdr server will relay the target’s request using
socatto the GoPhish server. - The GoPhish server will present the HTTPS SSL certificates and the landing page to the user
Installation and Initial Use
- Create your DigitalOcean account and create a domain in the DigitalOcean interface.
- You need to have terraform installed.
- Create a new SSH keypair. You don’t want to set a passphrase. Store both the public and private keys in
~/.ssh
ssh-keygen -t rsa- Clone the repo here
- Copy
variables_sample.tftovaraibles.tf - Edit
variables.tf. Include your DigitalOcean API key, specific domain and desired subdomains. - Run
terraform applyto see what terraform will do when executed. This is a good chance to catch any errors if there are any. - If everything looks good, run
terraform applyand typeyeswhen prompted. - Wait…it shouldn’t be too long…
- Run the script
finalize.sh. This will log into these new instances over SSH and set up DKIM and LetsEncrypt SSL certificates. - While you wait for the systems to reboot (should have been started in the finalize.sh script, otherwise manually reboot them) – enter the DKIM string output by the finalize.sh script into the DKIM TXT record in the DigitalOcean interface.
- Now you should be able to SSH into you 2 new systems with the following commands.
ssh -i ~/.ssh/id_rsa root@<phishing_subdomain1.domain_rdir>
ssh -i ~/.ssh/id_rsa root@mail.<domain_rdir>
NOTE: SSH is only accessible from the IP address configured in the operator_ip variable using the SSH keys you generated above.
- Log into the GoPhish server (phishing_subdomain1.domain_rdir). Navigate to
/opt/gophish/and view thegophish.logfile. This will have the username and password required to log into the gophish interface. - Log into the GoPhish interface at https://phishing_subdomain1.domain_rdir:3333. This port is only accessible from the IP address configured in the
operator_ipvariable. You will be required to change the password when you first log in. - Phish and raise user awareness.
Backing Up GoPhish database
The data from gophish is stored in /opt/gophish/gophish.db. This file can be downloaded and restored when rebuilding a new GoPhish instance.
Future Improvements
In the future, as time and need arises, I’d like to expand this set up to include the following items.
- Incorporate an additional HTTP/Phishing/Payload server. This could run evilginx2 to handle modern two factor logins.
- Add a C2 setup to enable phishing with beacon/implant payloads. This would require a redirector as well to prevent the target system from identifying the long term C2 server.
Leave a Reply