This post is part of my series on Building an Atomic Red Team Lab. This is the first installation post where I’m going to document how I build, install and configure the central hub of the network.
Operating System
I’m going to be using vyOS. vyOS is a free and opensource firewall and router operating system. It’s a powerful platform, but there’s no GUI. It’s all CLI. I haven’t used it much so I’m excited to learn a new technology.
Virtual Machine
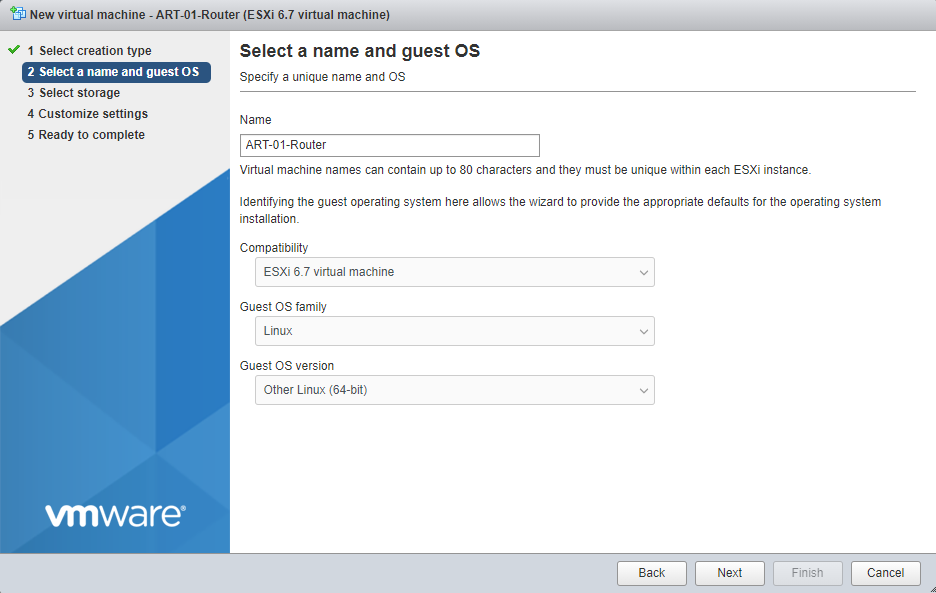
For the virtual machine, create a new Virtual machine with the following settings.
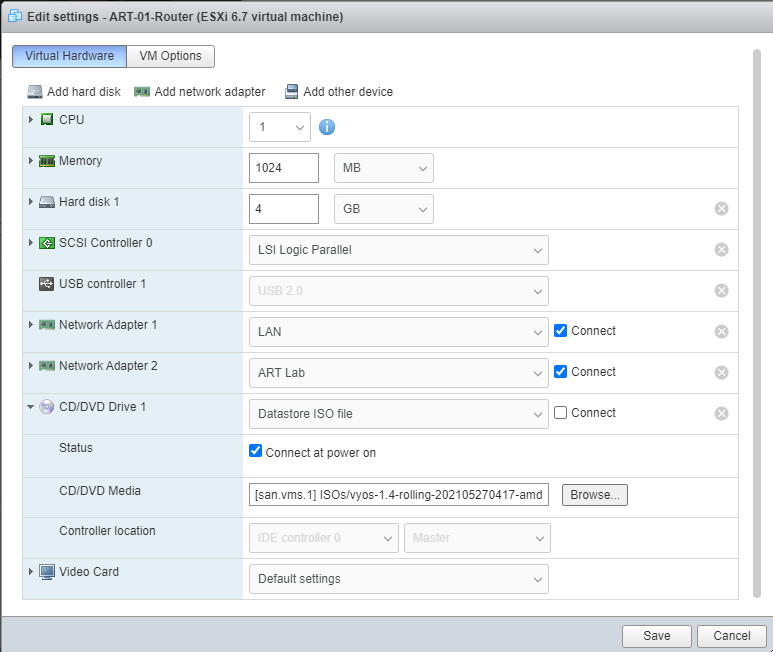
After that, let’s assign 1 GB of RAM and 4 GB hard drive for the router and link the vyOS ISO. We’ll also have 2 network interface cards, 1 for the Wide Area Network (WAN) and 1 for the Local Area Network (LAN).
Installing the Operating System
Most of this is following the official documentation to install vyOS on the new VM.
- Boot the Virtual Machine
- Login with the credentials
vyos:vyos
Run these commands to install vyos
install image
yes
auto
sda
Yes
4294
1.4-rolling-20210527
/opt/vyatta/etc/config/config.boot
<pick a secure password>
sda
reboot
y
The system should reboot. Then you can log in with the credentials vyos:your_secure_password
Configuring the System
To make any configuration changes on vyOS, you need to be in configuration mode. After that, you can make the changes you want. Those changes then need to be commited and saved to the configuration file.
- To enter configuration mode, type
configure - To commit your changes, type
commit - To save your changes so they persist across reboots, type
save
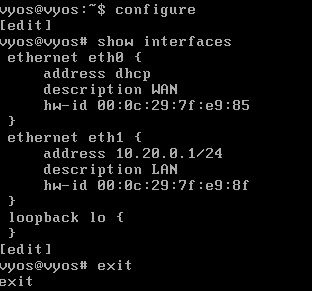
Configure the Interfaces
We have 2 network interface cards, so we need to configure which is which. Let’s set eth0 to the WAN side and eth1 to the LAN side.
configure
set interfaces ethernet eth0 address dhcp
set interfaces ethernet eth0 description 'WAN'
set interfaces ethernet eth1 address '10.20.0.1/24'
set interfaces ethernet eth1 description 'LAN'
commit
save
exit
You can verify these changes with
configure
show interfaces
exit
DHCP Servers
Since I’m using static IPs, I decided to skip setting up a DHCP server. In hindsight, you might want to set this up. The following commands set the DHCP range from 10.20.0.240 – 10.20.0.254.
Once the domain controller is set up, we can adjust the dns-server from 10.20.0.1 to 10.20.0.10 to have DHCP clients use the Domain Controller as the primary DNS server.
configure
set service dhcp-server shared-network-name LAN subnet 10.20.0.0/24 default-router 10.20.0.1
set service dhcp-server shared-network-name LAN subnet 10.20.0.0/24 dns-server 10.20.0.1
set service dhcp-server shared-network-name LAN subnet 10.20.0.0/24 domain-name 'art.lab'
set service dhcp-server shared-network-name LAN subnet 10.20.0.0/24 lease '86400'
set service dhcp-server shared-network-name LAN subnet 10.20.0.0/24 range 0 start 10.20.0.240
set service dhcp-server shared-network-name LAN subnet 10.20.0.0/24 range 0 stop 10.20.0.254
commit
save
exit
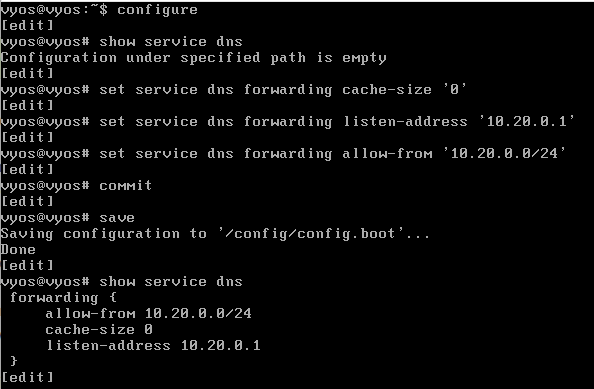
Configure a DNS Service
Domain Name Resolution (DNS) service is a fundamental network protocol. It could be considered the phonebook of the internet. DNS converts URLs (easy for humans to remember) to IP addresses (much harder for humans) to remember.
Since we’re going to need internet access to pull down updates, additional dependencies and other tools, let’s set up a DNS service on our router.
configure
set service dns forwarding cache-size '0'
set service dns forwarding listen-address '10.20.0.1'
set service dns forwarding allow-from '10.20.0.0/24'
set service dns forwarding name-server 8.8.8.8
set system name-server 8.8.8.8
commit
save
exit
Configure a Network Address Translation
Network Address Translation (NAT) is a process to map internal IP addresses to a single external IP address. This enables all devices behind a router to communicate using a single external IP.
I’m going to configure vyOS to use masquerading. This is a technique that makes the traffic look like it originates from the router’s IP address rather than the device hidden behind the router, typically using an internal IP address. This is such a common technique to use with NAT that it’s commonly used interchangeably.
configure
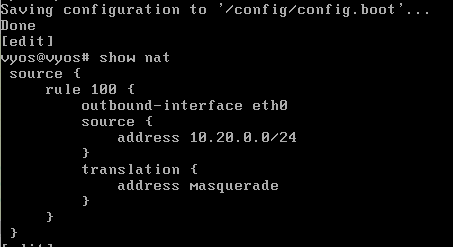
set nat source rule 100 outbound-interface 'eth0'
set nat source rule 100 source address '10.20.0.0/24'
set nat source rule 100 translation address masquerade
commit
save
show nat
exit
Configure the Firewall
Moving on to the firewall. vyOS uses a stateful firewall. Stateful firewalls operate at layer 3 and 4 of the OSI Model. This type of firewall keeps track of the state of each active network connections while analyzing incomming traffic.
vyOS works by having zone firewalls. For this network, we have WAN and LAN zones. Each zone can have 3 directions: LOCAL, IN and OUT.
LOCALApplies to traffic that is destined for the router/firewall itselfINApplies to traffic that is ENTERING the interface, heading for OTHER networksOUTApplies to traffic that is EXITING the interface, heading for THIS network
Note, IN and OUT may seem backwards…but IN traffic is heading into the firewall to flow out to the internet. OUT traffic is flow out of the router and into the network.
As an example, if we want to allow HTTP from the WAN to the LAN, we’d configure that on the WAN-OUT ruleset. Because the traffic is exiting the firewall destined for the LAN network.
Finally, there are 4 states to network traffic the firewall can filter on:
newThe incoming packets are from a new connectionestablishedThe incoming packets are part of an existing connection that has seen traffic in both directionsrelatedThis incoming packets are new, but they are associated with an existing connection. An example of this would be FTP data transfers or ICMP errors related to a connection.invalidThe incoming packets do not match any of the other states
configure
set firewall name WAN-IN default-action 'drop'
set firewall name WAN-IN rule 10 action 'accept'
set firewall name WAN-IN rule 10 state established 'enable'
set firewall name WAN-IN rule 10 state related 'enable'

set firewall name WAN-LOCAL default-action 'drop'
set firewall name WAN-LOCAL rule 10 action 'accept'
set firewall name WAN-LOCAL rule 10 state established 'enable'
set firewall name WAN-LOCAL rule 10 state related 'enable'
commit
save
exit
Based on the rules above, I shouldn’t be able to ping the router, but it works.
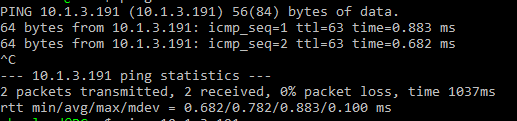
What happened? We created the rules, but they aren’t applied to any interfaces yet.
configure
set interfaces ethernet eth0 firewall in name 'WAN-IN'
set interfaces ethernet eth0 firewall local name 'WAN-LOCAL'
commit
save
exit
Now that the rules are applied, pinging the router from the WAN side fails.

That’s fun, but I think I’d like to re-enable pinging from the WAN side for troubleshooting purposes.
configure
set firewall name WAN-LOCAL rule 20 action 'accept'
set firewall name WAN-LOCAL rule 20 icmp type-name 'echo-request'
set firewall name WAN-LOCAL rule 20 protocol 'icmp'
set firewall name WAN-LOCAL rule 20 state new 'enable'
commit
save
exit
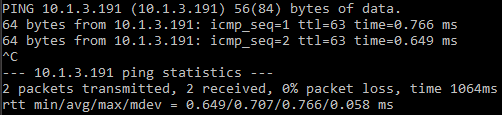
Great. I can ping the router now. If this was for more than a lab environment, you should enable key based authentication, replace the default user name, etc. But we’re gonna skip all that.
Snapshot
It’s a good idea to take a snapshot of the virtual machine now so we have something to revert to if something breaks or we try something malicious and need to reset.
Leave a Reply